Podcast Studio
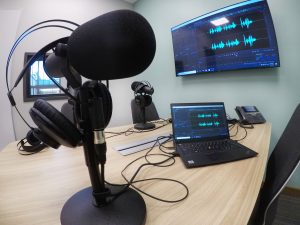
The Ada Podcast Studio features a mostly sound-restricted room and a complete suite of technology for creating podcasts.
This studio is located in the new Amy Van Andel Library. Library staff are not experts with Podcasting and Podcast equipment. Library staff can orient you to the basics of the equipment. We highly encourage viewing the instructions listed below before your reservation.
NOTE: A library card is required to reserve this room.
Single Button Module
Reserve the Podcast StudioSingle Button Module
Get a Library Card- RODECaster Pro Podcast Production Studio with a micro-SD card inserted for temporary storage during your session
- Three instruction cards detailing every part of the RODE Caster
- Three Shure SM7B cardioid dynamic microphones with cords
- Three Jam Stands JSDMS50 mic stands
- Three AKG K52 closed-back headphones
- One laptop, loaded with RODECaster Pro and Adobe Audition editing software
- At the back of the RODECaster Pro Podcast Production Studio, you will find a red button on the far right. Hold down the button for a few seconds until you see the board light up.
- On the small screen, you should see a row of numbers 1-4 followed by the USB connection symbol, a cell phone icon, the Bluetooth connection symbol, a musical note and then the letters L R. If the board is powered on and you do not see this screen, touch the left-pointing arrow on the upper left side of the screen until you arrive at this home screen.
- The microphones should be plugged in to the jacks 1, 2 and 3, as numbered on the microphone stands. If not, the cords may have been plugged into different outlets on the back left side of the sound board. To test your microphone, just talk into it when on the home screen. Turn up the volume under buttons 1-4. Green lines will rise above the microphone jack that you are plugged in to. If you cannot hear yourself in your headphones, the most likely solution is to turn up the volume on the sound board for your numbered microphone.
- Repeat this step for all participants on your podcast, making sure everyone can be heard in their headphones. There are two buttons under the volume controls. The green ear icon is the “Solo” button to listen to the source on its own. The red button is the mute button, muting that audio source.
- The square colorful buttons provide sound effects as labelled. They have their own volume control. If you cannot hear them, try turning up the volume control to the left of the sound effects buttons.
- Additional inputs, including phone-in guests, may be added by connecting your phone with either phone cable or Bluetooth or by connecting your USB device to the USB port.
- The dials over the sound effects buttons control volume to the headphones provided and speakers (not provided).
- When all participants have tested their microphones and headphones and all optional auxiliary sound input has been checked, press the green REC button. It will become red while you are recording. To add sound effects, tap the desired button once. Tap the button again to stop the sound effect.
- To stop recording, tap the red REC button. It will turn green.
The laptop in the podcasting room is equipped with the RODECaster Pro App. Double click the icon on the desktop to open the app.
With the power still on to the RODECaster Pro Podcast Production Studio, click on “Podcasts” then toggle to Podcast Transfer Mode. The app will ask, “Are you sure you would like to enter Podcast Transfer Mode?” Click OK. There will be a short delay. Then you will see all podcasts on the SD card numbered and timestamped. (Podcasts stay on the card until deleted, so make sure to follow the instructions below to delete your podcast before you leave.) Click once on your recording. It will turn blue. Click Export. The computer will display a “Save as” dialogue box. Choose the desired location. If a flash drive has been inserted, it will appear here as a possible destination. The podcast may temporarily be saved anywhere on this laptop (or any other laptop plugged into the USB port on the RODECaster Pro Podcast Production Studio) in order to be uploaded or edited.
The podcast can be edited using Adobe Audition, which is loaded on the laptop. Instructions for editing with Adobe Audition can be found in the Help menu, on the Lynda database on the KDL website or in YouTube videos (which are not curated by the library).
After desired editing, the podcast should be saved to a flash drive or uploaded to a desired location. All new files will be purged from this laptop during every reboot.
Unplug the library laptop from the USB cord connecting it to the RODECaster Pro Podcast Production Studio and plug in your own laptop. Use the small touch screen on the RODECaster Pro Podcast Production Studio to transfer. Tap the settings icon. Choose “Advanced,” then choose “micro-SD card.” Toggle on “Podcast Transfer Mode” and then tap “yes.” Your computer should now open a dialog box to open files on the RODECaster Pro — name them and transfer them to your computer.
The podcast should be removed manually from the library’s micro-SD card. To do this, tap the settings gear icon on the upper left corner of the home screen on the RODECaster Pro. Tap the icon in the upper right marked “Podcasts.” Find your podcast by the time stamp at the top and tap the trash can icon. This will permanently delete your podcast from the Rode Caster Pro.
When finished, please restore the room to its previous condition and bring the key to the librarian, who will verify the room’s equipment inventory.